This user’s guide covers the Version 2 of Great Coach Hockey. We have written the guide to get you up to speed and get the most out of Great Coach Hockey.
If your new to Great Coach Hockey, try starting with the Getting Started section first. If you just need a little help, pick from one of the tasks in the table of contents to get the instructions you need.
Getting Started
The easiest way to get started with Great Coach Hockey is jump in and set up your team, players, fixture and some games.
Setting up your teams
This Great Coach Hockey tutorial shows you how to set up your team:
Add a new team
Change your team’s preferences
Add players to the team
Add games to your team’s fixture
Content in development
Video is currently in production and will be available shortly
Match Planning
This Great Coach Hockey tutorial shows you how plan your team’s set up:
Adding players to a plan
Copying player set ups
Adding planned rotations for players
Replacing a player in a planned
Changing formations
Sharing the set ups with the team
Content in development
Video is currently in production and will be available shortly
Match Play
This Great Coach Hockey tutorial shows you how play a match:
Starting and ending a period
Viewing player time
Recording scores and statistics for players and teams.
Moving players between positions
Making planned player rotations with the rotation panel
Content in development
Video is currently in production and will be available shortly
Match Review
This Great Coach Hockey tutorial shows you review a match, statistics and reports:
Reviewing the match timeline and editing statistics
Reviewing the statistics sheet
Customising your own statistics reports
Editing statistics on the statistics sheet
Reviewing the shot report
Customising statistics and statistics boards
Content in development
Video is currently in production and will be available shortly
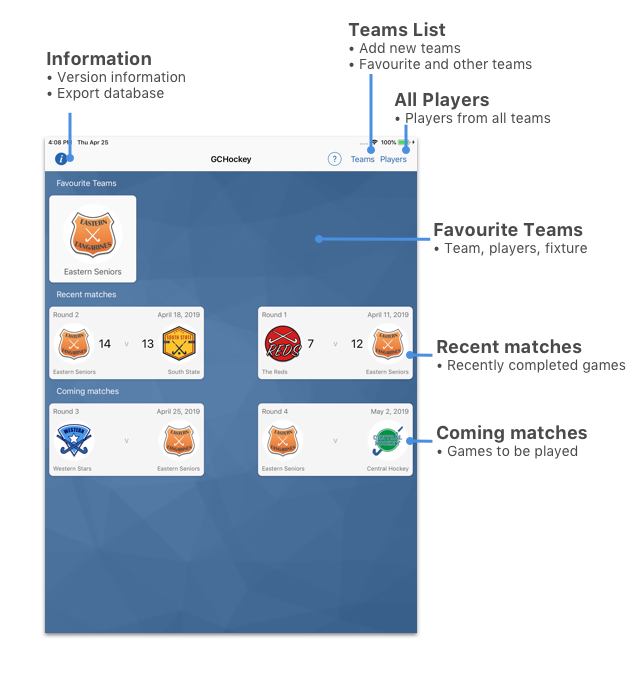
Your Dashboard
The Dashboard gives you access to your favourite teams, recent games played and coming games.
Great Coach Hockey allows you to have many teams set up on your iPad.
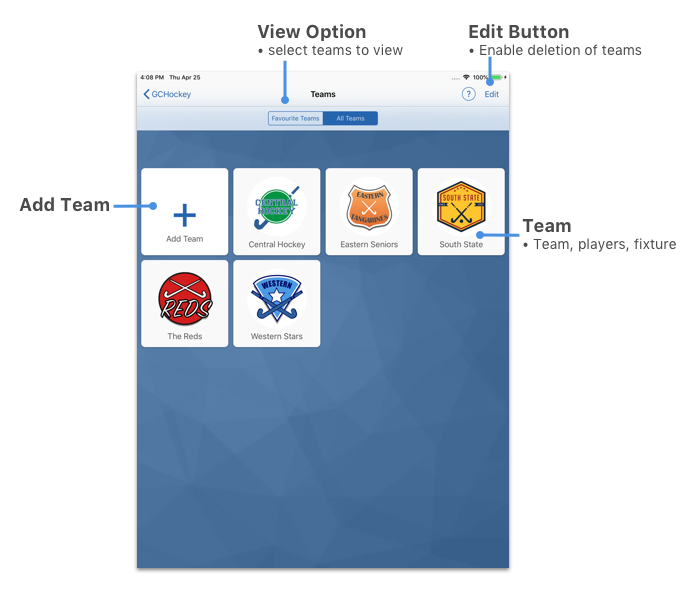
To see all your teams select the Teams button in the navigation bar.
To see all your games, select your Team, the select the Games to see the full fixture.
Adding Teams
To add a new team:
From the Dashboard, tap the Teams button in the navigation bar.
Tap the ** Add Team** button.
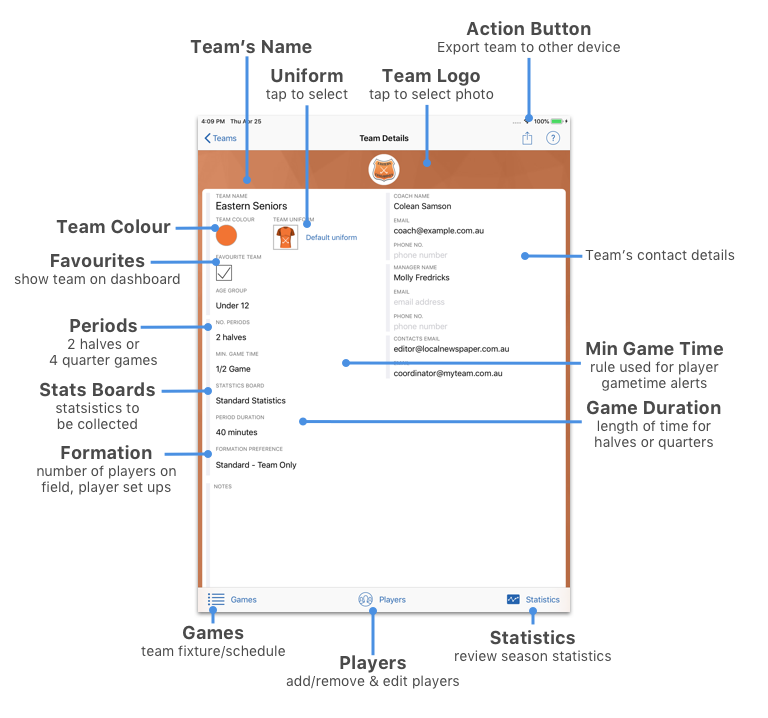
Enter the details for your team you can tap on each field and enter:
Name of the team
Team Colour - select a team colour to make your team easier to see in game play
Team Logo - add a photo of your team’s jumper
Select an Age Group - this will select the period length.
Number of periods per game - ( 2 halves or 4 quarters)
Period duration - how long each period lasts
Statistics Board - select the type of statistics you want to collect for this team
Game Time - lets you set up warnings if players don’t get sufficient game time
Coach & Manager details - for reference, emails here are used in match report emails so they are worth setting up.
Other eMail addresses - these are additional contacts to be included in match report emails.
Favourites Button - tap the checkbox to make your team a favourite and to appear on the dashboard
Hint
To delete a team. Tap the Teams button from the navigation bar then select Edit to remove a team.
Adding Players
To add a new player to a team:
From the Dashboard or the Team List, tap on your team.
From your Team screen, tap on the Players button in the bottom toolbar.
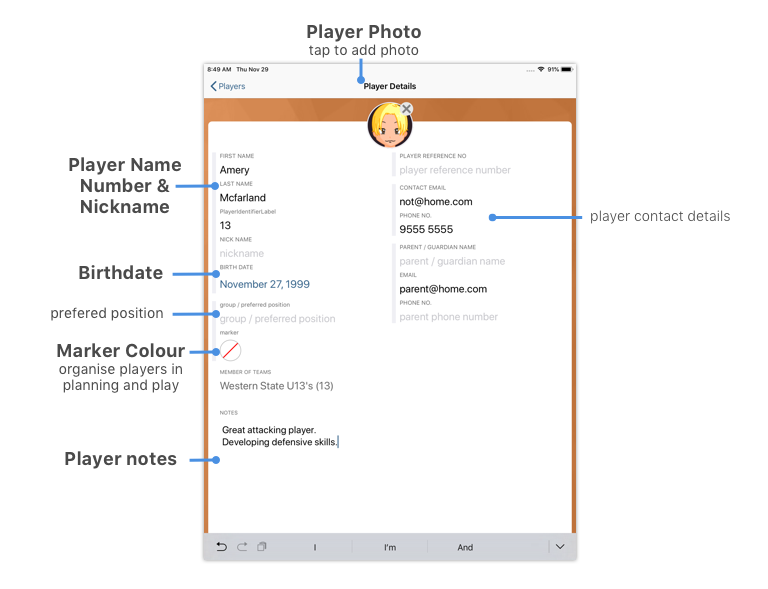
Tap the + Add Player button. On the Player screen enter details for:
Name, nickname & date of birth
Number/jumper
Photo - select a photo from your photo album
Add player contact details. Your player’s email address will be used in
match report emails.
Add parent/guardian contact details (if required). Email addresses for
parent/guardians are automatically added to match report emails as well.
Add player development notes
Add a marker colour to help organise your players. Players will have marker colour shown in planning and game play.
Tap the < in the navigation bar to return to your team and add another player.
Great Coach allows Players to be members of multiple teams. A player can have a unique jumper number in each team.
To add a player that has been in another team:
From the Dashboard or the Team List, tap on your team.
From your Team screen, tap on the Players button in the bottom toolbar.
Tap the Add existing player from the bottom toolbar
Scroll through the player list and select a player. Only players not already part of the team will be added.
Tap on the added player to set their jumper number.
Removing Players
To remove a player from your team:
From the Dashboard or the Team List, tap on your team.
Tap the Players button in the bottom toolbar.
Tap the Edit button to enter edit mode.
Scroll to find find the player you want to remove from the team.
Tap on the X button to remove that player.
Note
The player is only removed from your team. They are still available from the Players menu in the Dashboard and can be added to another team without re-entering their details.
Import Players
If your player information is in a spreadsheet or can be obtained from your league as a file you can use the Player Import feature to quickly add all players details.
You will need to convert your player information in to a CSV (Comma Separated Variable) file before importing into Great Coach. See the format of the information below.
To use the player import feature:
From the Dashboard or the Team List, tap on your team.
From your Team screen, tap on the Players button in the bottom toolbar.
Copy your spreadsheet file and paste it into the Import Text field. Its fine to paste multiple lines at once.
The Preview will show how Great Coach will import the player information.
If the player details are correct, select the Import button in the top navigation bar.
The number of players imported or any errors will be shown.
The first line of your player information must include a list of headings from the list below.
Heading
Name on form
dob
Date of Birth DD-MMM-YYYY format e.g. 12-Mar-2003
firstname
First name
lastname
Last name
nickname
Player nickname
notes
Notes
number
Number
email
Contact Email
phone
Contact Phone
parentemail
Parent’s Contact Email
parentphone
Parent’s Contact Phone
group
Group Label
playerid
Player’s Reference/Registration Number
Note Use a separator character between each heading and player information. You may use tabs, commas or spaces or a vertical line (pipe) character.
Adding Games
Great Coach allows a team to be part of multiple competitions. For example you may have a competition for practice matches, the regular home and away season, finals etc. You can view your teams statistics for each each of these competitions.
To add a game for your team:
From the Dashboard or the Team List, tap on your team.
From your Team screen, tap on the Games button in the bottom toolbar.
Tap the + button in the top navigation bar to add a team to the ‘home and away’ season. You can also tap the + button next to each competition to add a game to that competition.
Tap on the Opposition buttons to select an opponent. The list of opponent teams will appear.
Select a team from the list if an opponent is available
To add an opposition team, enter the team name in the search field and press the + button to add the opposition team. You can later set the opposition teams colours, players etc.
Enter the following details
You can enter a round number for the match or Great Coach will calculate it based on the date of the match.
Select the competition. To add a new competition, enter the name in the search field and press the + button.
Select if the game is home or away
Enter a location for the games
Great Coach will allow additional information to be entered once the game has been played.
Importing Games
If your game information is in a spreadsheet or can be obtained from your league as a file you can use the Game Import feature to quickly add all games in a competition.
You will need to convert your player information in to a CSV (Comma Separated Variable) file before importing into Great Coach. See the format of the information below.
To import game information into a competition:
From the Dashboard or the Team List, tap on your team.
From your Team screen, tap on the Games button in the bottom toolbar.
Select the import button next to the competition.
Copy your spreadsheet file and paste it into the Import Text field. Its fine to paste multiple lines at once.
The Preview will show how Great Coach will import the game information.
If the game details are correct, select the Import button in the top navigation bar.
The number of games imported or any errors will be shown.
The first line of your game information must include a list of headings from the list below.
Heading
Name on form
datetime
Date and time of match in DD-MMM-YY hh:mm format e.g. 12-Mar-2018 14:30
home
Indicates a home game yes/no
opponent
Opposition team name (opposition teams will be created with this name)
location
address or location name for the game
round
an optional round number, this can be calculated based on date and time of match
Note Features to view match statistics, send the match report or Tweet the result are only available once the match has been played
Note Great Coach allows a team to be part of multiple competitions. For example you may have a competition for practice matches, the regular home and away season, finals etc. You can view your teams statistics for each each of these competitions.
Deleting Games
To delete a game from your team’s schedule:
From the Dashboard or the Team List, tap on your team.
From your Team screen, tap on the Games button in the bottom toolbar.
Tap the Edit button in the top navigation bar. Each game will have a delete button appear.
Tap on a game’s delete button.
Confirm that the game should be deleted and the game is removed.
Note When starting a new season you shouldn’t need to delete all your games. We recommend starting a new team and adding a fresh schedule of games to the new team.
Planning a Game
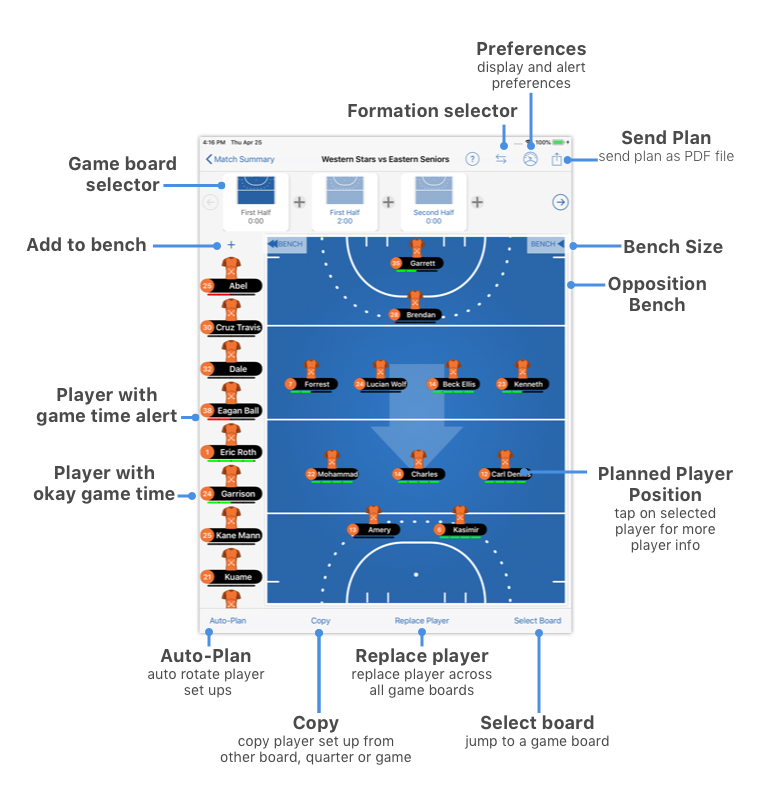
Great Coach lets you plan your player positions half by half. You can also plan player interchanges (rotations) during halves at set times. As you plan your player positions, Great Coach shows the calculated game time for each player to you can ensure equal game time for juniors.
Once you play the game, Great Coach will automatically watch the clock and give you reminders when certain players need to be moved and where to. You only need to focus on which position you want players during the game.
Hint You don’t need to plan a game to play a game. If you would just like to use Great Coach for its whiteboard and stats you can skip this step and go straight to Playing a Match.
Changing Formations
Each game board can be assigned a formation from Great Coach’s available formations.
You can select a formation for each game board in the planning mode. To change formation for a game board:
Tap the formation button in the top navigation bar. A list of available formations will be shown.
Tap on a formation. The team will be arranged into the selected formation.
You can set all game boards to use the same formation by:
Tap on the formation button in the top navigation bar. A list of available formations will be shown.
In the list tap on the Use current formation for all boards option.
All game boards will be changed to the current game boards formation.
Setting up your players
To plan your player positions:
Select a game from your team’s list of games.
Press the Plan button to enter planning screen.
Note You can still review the plan for a match that has been played. The Plan button will be replaced by a Review Plan button.
Adding Players to the Game board
To add players to the court:
Tap on an empty position, a list of players will appear.
Tap on the player in the list. The player will be added to that position.
To add players to the bench:
Tap the + button at the top of the bench, a list of players will appear.
Tap on the player from the list. The player will be added to the bench.
Hint As you add and move players, Great Coach Hockey calculates the planned amount of game time for each player and displays a bar showing the amount of match time.
Quickly adding a player to the teams
During game play and planning you can quickly add a player to a team or the opposition team. To quickly add a player:
Tap on an empty position or the bench + button. The list of available players will appear.
In the search box enter a jumper number and first name or a jumper number, first name and a last name. Some examples are ‘8 John’ or ‘8 John Smith’
Tap the + add button to add the player to the team and the position.
Hint If need to enter additional player details, tap twice on the player, the player info pop over will appear and select the more.. button to edit the player’s details.
Swapping Player Positions
To swap two players positions:
Press and hold on a player. The player will lift of the game board.
Drag the player to the other position and release your finger. The players will then exchange positions.
Removing a Player
To remove a player from the board:
Press and hold your finger on a player. The player will lift of the game board.
Drag the player to the top of the page. Release your finger and the player will be removed from the court.
Hint You can add the player back to the team by adding them to the bench or an empty position.
Changing Game board
For a new game, a game board is added for each period. To add another game board you can:
Tap on any of the displyed game boards. The game board will then be shown.
Press the forward and back buttons at the top of the screen. The next game board in that direction will be shown.
Press the Boards button in the toolbar. A list of all the game boards will be shown.
Copying Game boards
You can copy all player positions from one game board to the next. To copy all player positions:
View the board you would like to set up.
Press the Action button at the top of the screen. A list of the game boards will be displayed.
Tap on the game board you want to copy. All the player positions for this game board will be copied.
Planning Rotations
Great Coach uses game boards for planning what players are on the court and their positions. There is a game board for each period in the match. You can set up the player positions for each period. To plan for rotations, can add additional game boards to time player rotations during the period.
Each game board is identified by the Period and the time. One game board for each period is automatically added to the game with the starting time in the period of 0:00. Other game boards can be added for timed player rotations. For example Half 2 5:30 is a player rotation a the 5 1/2 minute mark of a match.
Hint If you only want to track player time and statistics, you only need to set up the starting line up and leave the other game boards empty.
Viewing the game boards
All the game boards for a match are shown in a list at the top of the screen. There are several ways you can view a game board:
Tap on the game board in the game board list. You can swipe left & right to scroll the list.
Scroll the game board list using the arrow buttons at the end of the list.
Press the Select Board button in the bottom toolbar. A list of the game boards will appear tap one to select.
Adding a rotation game board
To plan a player position change at a specific time:
Scroll the list of game boards to where you would like to add the player rotation.
Press the + button between game boards. A pop over will appear with the new game board.
Use the slider control to adjust the time for the rotation.
Press the Add Gameboard button to add the new game board
The players positions from the previous board will then be copied to your new board.
You can then move the players between positions for the rotations.
Changing the time of a rotation
To change the time of a game board:
Scroll the list of game boards to the game board you would like to change.
Tap on the game board and the game board details screen will appear.
Use the slider to alter the time of the rotation.
Press the Update button.
Removing Game boards
To remove a game board:
Scroll the list of game boards to the game board you would like to remove.
Tap on the game board and the game board details screen will appear.
Press the Delete button to delete the game board.
Note You can’t remove the game board for the start of each period.
Copying game boards and rotations
To speed up your planning, you can copy an individual game board, a period with several planned rotations or the game plan for an entire match.
To copy a single game board:
Select the game board you would like to replace.
Tap the Copy button in the bottom toolbar. A list of copy options will be shown.
Scroll the list to the Copy single board from game section and select a game board to copy.
All player positions from that game board will be copied to the current game board.
To copy all the rotations from a period:
Select a game board in the period you would like to replace.
Tap the Copy button in the bottom toolbar. A list of copy options will be shown.
Scroll the list to the All boards from section and select a period to copy.
The period will now have the same player positions and rotations.
Hint You can use this to set up a set of rotations once in a period and then copy these rotations to each period.
To copy the rotations and player positions from an entire game:
Tap the Copy button in the bottom toolbar. A list of copy options will be shown.
Scroll down to the Full game from section. This section contains a list of your teams games.
Tap on a game to select it.
All player positions and rotations will be copied.
Substituting a players
Often players in your plan will be unavailable due to injury and illness. To quickly alter your plan for a substitute player, Great Coach allows you to replace a player with a substitute.
To substitute a player in your plan:
Tap on a player in the game board to select it.
Tap the Replace Player button in the bottom toolbar.
Select a player from the list (note: you can only replace with a player that is not part of the plan)
The selected play will be substituted into all game boards.
Hint You can quickly add a substitute player into the team by entering the players name in the Replace Player list by entering a jumper number and a name and pressing the + button.
Sharing your game plan
Great Coach can generate a game plan that you can share with the team. The game plan has the player line up for each period as well as timed player interchanges and movements.
To share the game plan:
Tap the Action button in the top navigation bar.
The game plan report will be shown you can scroll through it to view the full plan.
Tap the Action button at the top of the report to send it as a email to the team.
Tap the Printer button to print the report directly from your iPad.
Playing a Match
Playing a match allows you to collect player statistics, scores and monitor player game time. If you have planned a match, Great Coach will provide you alerts on when to rotate players and to what positions.
Playing a match is controlled Game Status by the button in at the top of the navigation bar. Pressing this button will allow you to:
Start the clock for period
End a period
Move the players to the starting line up for the next period.
Pause the clock for injury.
Add an extra time period - sometimes used in finals.
End the match.
Setup for a Period
To commence playing a match:
Tap on the game you would like to play.
Select the Play button from the bottom navigation bar. The first game board will be displayed and your players set up into positions.
Make any position changes with your team.
Drag players to the top of the page to delete them.
Tap on empty positions to add a player.
Drag players to other positions to swap player positions.
Playing a Period
Once your ready to commence the period:
Tap the Game Status in the top navigation bar.
Tap the Start Period button. The clock will now commence counting down.
An alert will be sounded when the period’s time is up. To add time on, simply let the clock continue to run.
Ending a Period
Once the period is complete:
Tap the Game Status in the top navigation bar.
Tap the End Period button. The clock will be stopped.
To set up for the next period and to see the starting line up:
Tap the Game Status in the top navigation bar.
Tap the Set up next Period button. Players will be moved to the the planned starting positions.
Move players as required.
Follow the same process for Playing a Period.
Ending a match
Once the last period is complete:
Tap the Game Status in the top navigation bar.
Tap the End Period button.
If no additional periods are required, press the Game Complete button.
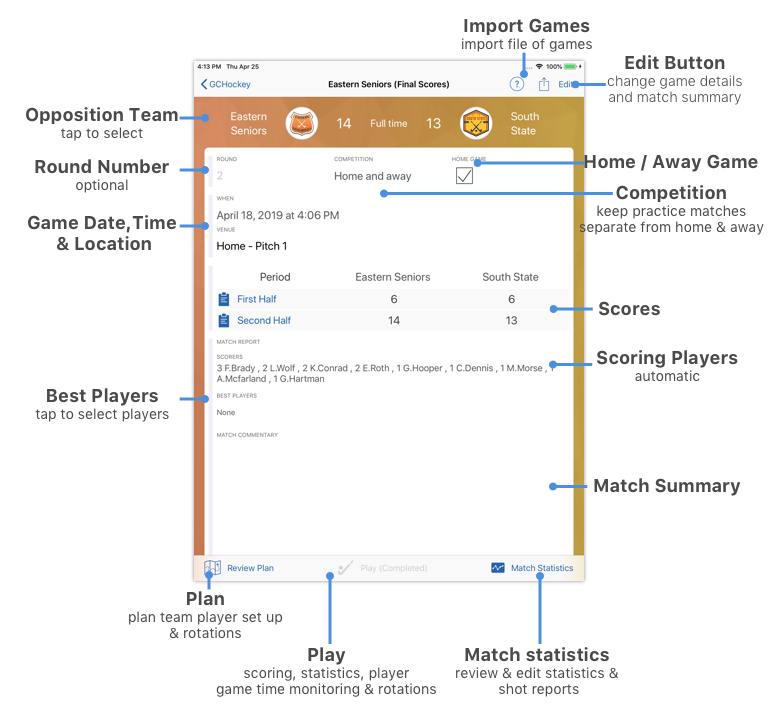
The match is completed and you will be show the match summary screen with final scores.
Adding extra time period
Occasionally extra time periods can be added to the end of a match such as finals. To add an extra time period:
Tap the Game Status in the top navigation bar.
Tap the End Quarter/Half button for the final period.
Tap the Game Status in the top navigation bar.
Tap the Add Extra Period button to add extra time.
Tap the Game Status in the top navigation bar.
Tap the Start Period button to start the clock.
You can continue adding extra periods or select Game Completed to end adding extra periods.
Changing your game plan
During the match you may want to alter your game plan. You can select Game Plan button in the top navigation bar to alert the game plan.
Changing formation
You can change the current formation by selecting the Formation button in the top navigation bar and selecting a formation. This formation will keep in effect until the next planned game board.
Changing team Details
In the game play mode, you can still edit team details, change their colours etc. To change a teams details:
Press and hold the team name in the scoreboard area.
An Edit button will appear. Tap it to edit the team details.
Enter team information and then return to the game play mode by pressing the < button.
Moving Players
Players can be moved on the game board at anytime. Whenever the clock is running, Great Coach is monitoring the amount of game time / bench time for a player and the amount of time spent in a position.
Keeping the game board up to date with player interchanges and rotations will provide accurate time keeping of player activity in the game.
To move players:
Press and hold the player. The player will lift of the game board.
Drag the player to a new position or to the bench.
If the position is already occupied, Great coach will exchange player positions.
Collecting Statistics and Scores
Great Coach allows you to collect statistics for individual players or teams.
To collect statistics for a team:
In the scoreboard area, tap the team name. The team name will be highlighted.
Select a statistic from the Stats Board below the scoreboard. (If you can’t see the statistic you are looking to collect, you can swipe to scroll the Stats Board)
If the statistic collects location information, the blank game board will be shown. Tap on the location in the game board where the statistic occurred.
Note The Stats Board shown in a game is set on your Team’s details page. See Adding Teams
Undoing a Statistic
If a statistic has been collected incorrectly:
Tap the Undo button above the scoreboard.
The last statistic will be removed and scores adjusted if required.
You can continue to press the Undo button to remove the next most recent statistic.
Reviewing collected Statistics
To review the recently collected statistics:
Tap the History button, a history of events will be shown.
Swipe up and down to scroll through the events.
To remove an event from the list of events. Swipe left to right. A delete button will appear. Press it to delete the statistic.
Player interchanges and rotations
If you have planned rotations and interchanges, Great Coach will provide reminders when rotations are coming and provide guidance on the interchanges to make.
When a planned player rotation time is reached arrows indicating the required player movements will be displayed.
Manually Moving Players
To move a player manually:
Press and hold the player. The player will lift of the game board.
Drag the player to a new position or to the bench.
If the position is already occupied, Great coach will exchange player positions.
Any reminder indicators will be removed from the game board.
Using the Rotation List feature
The Rotation List feature allows you to view all up coming rotations and to make game board changes automatically. To use the Rotation List feature:
Press on the Rotations button in the top navigation bar.
The Rotations List will be displayed. The Rotations List contains:
The current rotations that need to be made
Rotations that are planned shortly
Press the Accept all moves to make all player movements on the game board.
Press the Yes or No button on each planned move to accept them or reject them.
You can hide all reminder arrows being displayed by tapping the Show reminders switch.
In game statistics
Great Coach can provide you your team statistics and performance during the game. Team performance information is available in:
The Coaches Clipboard - a summary of match activity, key positives and negatives
Statistics Table - detailed statistics across team and players
Stats Location - Locations of statistics during the match
Completing a Game
Once the game is complete Great Coach allows you to finish off recording information about the game and even sending a match report. There are a couple of activities you can perform when competing a game:
Review and adjust Statistics
Select Best Players
Enter a match report
E-mail a match report
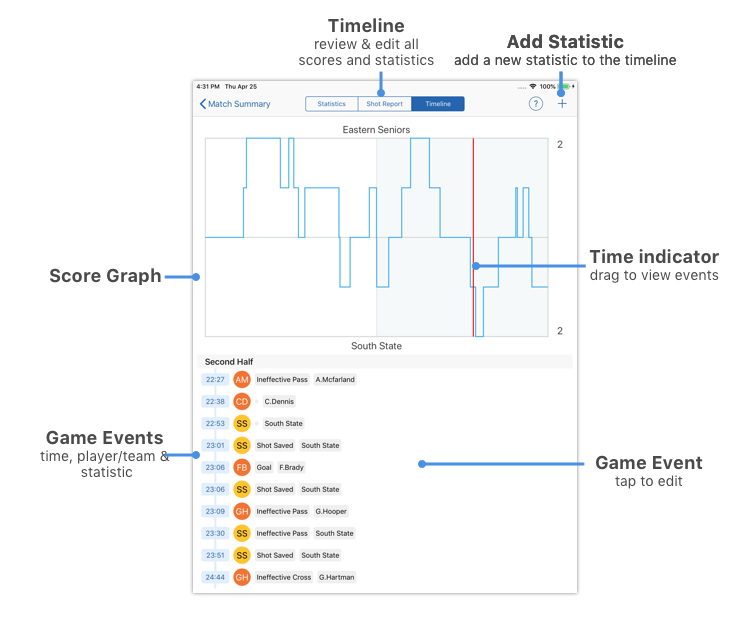
Adjusting statistics & scores
There are two ways to edit and adjust statistics:
Using the Timeline
From the Statistics Summary
Using the Timeline
From the game summary page:
Press the Timeline button in the bottom toolbar.
Scroll through the timeline of match events.
To add an event press the + button in the top navigation bar. Enter the new statistic details.
To delete an event swipe left to right across the event. A delete button will appear. Press it to delete the event.
To adjust an event. Tap the event in the timeline and adjust the statistics details.
Using the Statistics Report
From the game summary page:
Press the Match Statistics button in the bottom toolbar.
The match statistics will be displayed.
Tap the Edit button in the top navigation bar.
Scroll to statistic for either team or player and tap it.
The a statistic editor will appear and statistic and scores can be adjusted.
Adjustments will automatically recalculate the match scores.
Selecting Best Players
From the Game Summary Screen:
Tap the Edit button at the top of the page. You will now be able to make changes to the Game Summary.
Tap the list of best players. Two lists will be displayed side by side, Best Players and All Players on the team
Press hold and drag a player from your Players list into the Best Players.
Reorder the best players by pressing and dragging a player up or down in the Best Players list.
Remove a player from the Best Players list by pressing and dragging the player out of the list.
Enter a Match Report
To add a match report:
From the Game Summary Screen, tap the Edit button at the top of the page. You will now be able to make changes to the Game Summary.
Tap the Match Report area. The keyboard will appear and you may now type your match report.
Once finished tap the Done button to save your changes.
Sharing the Match Report
To view the full match report:
Press the Action button in the top navigation bar.
Select the format of the match report:
A Full report - includes scores, best players, scorers, match summary and a full timeline of match scoring events.
A Summary report - has all full report details without the timeline of Scores
A Text summary - is a short summary with text only suitable
The report will be generated and displayed.
Tap the Printer button to print the report from your iPad
Tap the Action button to send the report as an email.
Note The match report will automatically be sent to the coach, manager, players and player’s guardian email addresses if available.
Working with Statistics
Great Coach allows you to collect a rich set of team and player statistics to assist developing and reviewing your team’s performance.
Statistics Reports are a summary of statistics for either a game or season for your team.
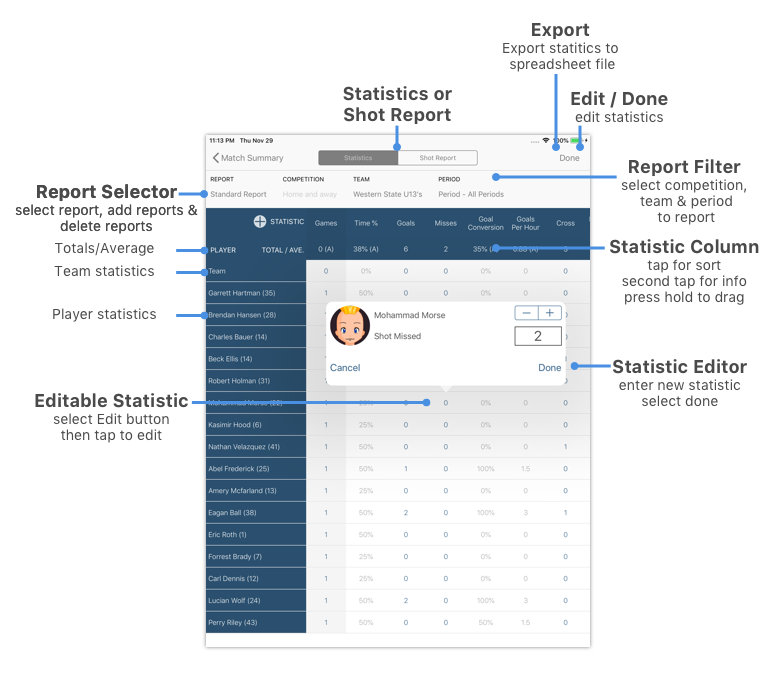
Viewing game statistics report
To view the game statistics summary:
Select a game from your team’s game list.
Select the Match Statistics button from the bottom toolbar.
Tap the Report button to select a report. Each report shows a selected list of statistics. You can create your own reports see Creating your own reports
Tap the Team button to select which team you would like to see. Your team or the opposition.
Tap the Period button to view the full match or an individual period.
Tap to select a column heading and sort statistics from highest to lowest.
Tap on a a selected column to display a description about the statistic.
Press and hold then drag a column heading to change the order that the statistics appear.
Great Coach Statistics Reports allow you select only the statistics you want to view. To select a report to view tap the Report button and select a report from the list.
Viewing team season statistics report
To view the team statistics summary:
Select your team from the Dashboard or the Team List.
Select the Season Statistics button from the bottom toolbar.
Tap the Report button to select a report. Each report shows a selected list of statistics. You can create your own reports see Making your own Report
Tap the competition button to view only statistics for a competition. (This lets statistics in practice matches and finals to be kept separate.)
Tap to select a column heading and sort statistics from highest to lowest.
Tap on a a selected column to display a description about the statistic.
Press and hold then drag a column heading to change the order that the statistics appear.
Sharing a report
You can share a statistics report in spreadsheet format. To share the statistics report:
Press the Action button in the top navigation bar.
Great Coach will generate the report in a Comma Separated Variable (CSV) file that can be opened by spreadsheets.
An email form will appear. Enter the recipient email address to send the report.
Customising a report
Reports can be customised to for needs. To customise a report:
Add another column to a report by pressing the + button in the statistic heading. Select a statistic from the list to be added to the report.
Reorder report columns by pressing and holding a column heading. Then drag left or right to re-order the columns.
Remove a report column from a report by pressing and holding a report column and dragging outside of the report and releasing. The column will then be removed from the report.
Adding a new report
New reports can be added to Great Coach for your needs. The add a new report:
Select either a Season Statistics or Match Statistics to view the reports screen.
Tap the Report Button to see a list of available reports.
In the search field enter a name for your new report.
Tap the + button to add the new report.
An empty report screen will appear. You can now select statistics to add to the report.
Select either a Season Statistics or Match Statistics to view the reports screen.
Tap the Report Button to see a list of available reports.
You cannot delete the report you are viewing - so select a report that is not the one currently selected.
Tap the Report Button the list of reports will appear. Swipe your finger left to right across the name of the report you wish to delete.
A delete button will appear. Tap it to delete the report.
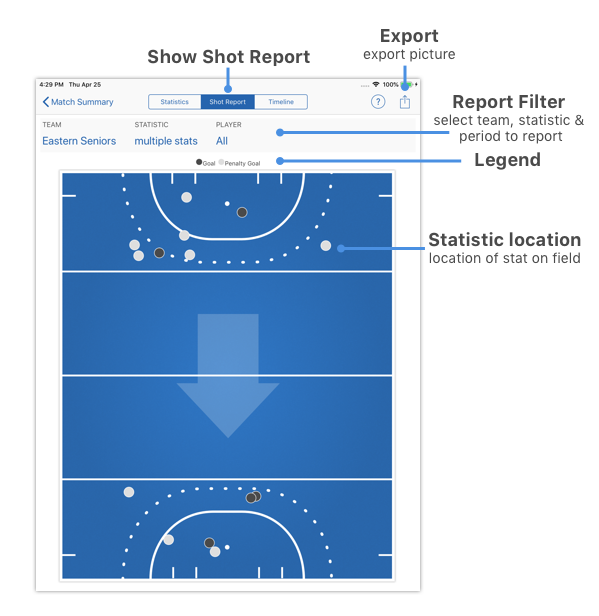
Viewing Shot Report
The Shot Report allows the you to review the position of statistics around the ground. Not all statistics have location capture enabled. See Customising Statistics Boards for more information.
To view the Shot Report:
View the Statistics Summary report for a team or a game.
Select the Shot Report option in the menu.
For Game Statistics, tap the Team button to select the team to view.
Tap the Statistic button to select the statistic to view in the report. (Statistics require location capture to be enabled to appear in the list)
Tap the Player button to select a player or to view all players.
To share the report. Tap the Action button in the top navigation bar to view the report. Select the Printer button to print or Action button to email the report.
Statistics Boards
Statistics Boards allow you to customise what statistics are collected by Great Coach and to allow you to customise the appearance of statistics.
Great Coach provides several preset Statistic Boards you can use, customise or add your own.
Great Coach also has a set of custom statistics that you can define for your own purposes. See Custom Statistics Buttons
Selecting a Statistics Board
Each team is assigned a Statistic Board so that statistics would be common across a season. You can of course change the statistic board assigned to a team before a match.
To select a Statistics Board for a team:
Go to your Team Details screen.
Tap the Statistics Board button. A list of available reports will appear.
Tap to select the Statistic Report.
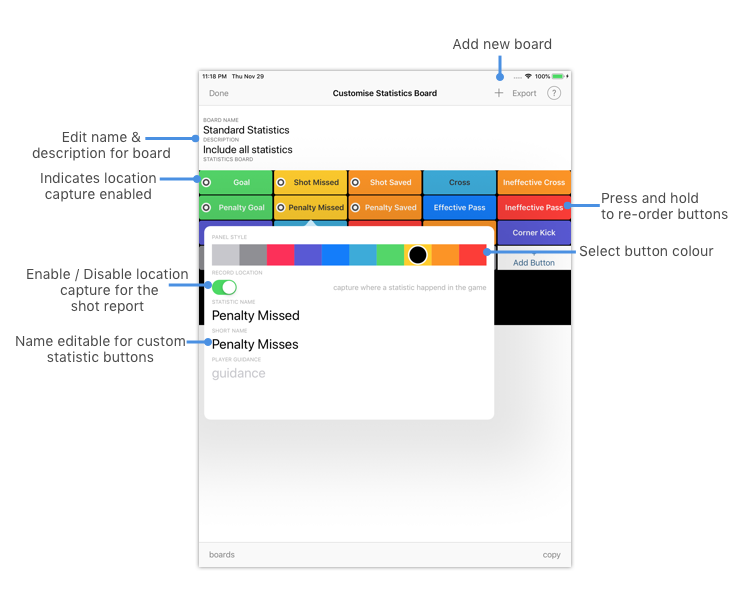
Adding a Statistic Board
Statistics Boards can be customised for the needs of your teams. You can select which statistics are collected, the appearance of buttons, determine if statistics locations are required and rename custom statistics buttons.
To add a Statistic Board:
Go to your Team Details screen.
Tap the Statistics Board button. A list of available reports will appear.
Tap the Customise.. button to enter the Statistics Board customisation screen.
Tap the + button in the top navigation bar to add a new Statistics Board.
You can now do the following:
Rename the Statistic Board - tap on the name and description fields to enter a new name for the statistics board.
Add a new Button - press the + Add Button and select a statistic from the list.
Re-order Buttons - press and hold and drag a button into the right position on the board.
Delete a Button - press and hold and drag a button outside of the statistic board.
To change the appearance of a button, tap on it to show the buttons properties. You can then:
Change the Colour - tap on the Panel Style colour from the available colours.
Record Location - tap on this to change if a statistic collects the location of a statistic or not.
Note: Recording Location can be very valuable information but does make the statistics collector require an extra step every time the collects a statistic. I Record Location is disabled, this statistic will not be available in the shot report.
Custom Statistics Buttons
Custom Statistics Buttons are available from the list of statistics. To add a custom statistic to a Statistics Board simply select if from the list of statistics when adding a Statistics Button.
Once you have added the custom statistics button to a board, you can customise it:
Tap on the Statistic Button to show is properties.
Select a colour for the Statistics Button.
Select if Record Locations is required.
Enter a name for the statistic. This name will appear on the button.
Enter a short name for the statistic. This name will appear in the statistic reports.
Enter player guidance for the statistic. This will appear in the coach’s clipboard.
Customising a Statistic Board
To customise a Statistic Board:
Go to your Team Details screen.
Tap the Statistics Board button. A list of available reports will appear.
Tap the Customise.. button to enter the Statistics Board customisation screen.
Select the board you want to work on. Tap the boards button in the bottom toolbar.
A list of statistics boards appear. Tap to select the Statistics Board you want to customise.
Tap the Statistics Board button. A list of available reports will appear.
Tap the Customise.. button to enter the Statistics Board customisation screen.
Tap the boards button in the bottom toolbar. A list of statistics boards appear.
You cannot delete a board you are viewing, so select another statistics board.
Tap the boards button in the bottom toolbar. A list of statistics boards appear.
Swipe from left to right across the stats board name in the list. A delete button will appear.
Tap the delete button to remove it.
Timeline
The game timeline screen allows you to review the detailed action in a game as well as to add, change and delete events in the game. Each statistic in the match is called an Event.
You can scroll through the game timeline and see the event, the team/player and time the event occurred in the game.
Deleting an event
You can remove an event from the game by doing the following:
Scroll through the timeline to locate an event to be deleted.
Swipe from right to left across the event row.
Select the delete button that has appeared.
Adding an events
If a key event was missed from the game, you can add a new event/statistic to the game by doing the following:
Select an event in the timeline that this event should occur before.
Tap the + button to add a new event in the timeline.
Tap on the new event and edit the following details:
Period - the period in game that the event happened
Timestamp - the time in the period. Use the slider to adjust.
Event Type - tap to select the event that occurred
Position - the position that the player was in
Team - the team for the events
Player - the player for the event (if required)
Adjusting and event
To adjust an event:
Scroll through the timeline to locate an event to be deleted.
Tap on the event in the timeline.
Adjust the event details as if you were adding an event. See above.
Note: If scoring statistics (goals/points) are added, deleted or changed the match scores will automatically be updated.
Preferences
Great Coach’s preference are available in game planning and game play screens.
To change preferences from the game play or game planning screen tap Settings button in the top navigation bar. From there you can adjust the following:
Forwards Left or select Forwards Right of the game board.
Bench Left or Bench Right for your team. The opposition team will be place on the opposite side if required.
Left Bench Size and Right Bench Size - you can adjust the width of the bench. A smaller bench gives you a larger game board.
Statistic Board Size - you can shrink or expand the size of the statistics board. All buttons will be available but you will need to scroll buttons for a large statistics board.
Playfield Options - display player photos, team uniform or just a basic colour to identify players.
Player time - enables or disables the display of the player time bar.
Player’s Nicknames - if a player has a nick name, it will use this name on the game board.
Show opponent positions - you can hide the opposition team positions and bench if you are not tracking player match ups or opposition team statistics.
Audio Alerts - you can control if player game time warnings, interchange alerts, clock 5 & 1 minute warnings are provided.
Countdown clock - is a display preference for the clock to count down or count up.
Exporting & Importing Databases
Great Coach Hockey allows you to keep a backup of your important team, games and player database. You can also use this feature to transfer your database from one iPad to another.
To use the Export and Import feature, you will require an email account or an iCloud account to end or store your database files.
Exporting your database
To export your database:
From the main clipboard screen select the Information button.
Select the Backup Database under the Utilities section.
An Share Sheet will be shown with options to eMail, Save to iCloud and even AirDrop.
Select one of the sharing options to send your Great Coach Hockey backup file.
Importing your database
There are several ways to import a database depending on how it was exported. Note: This will replace all your data with the selected database file. Ensure that you will not loose any team or games before selecting this option.
Importing from an eMail
To import your database:
Open your Great Coach Hockey application and keep the app open on the Dashboard screen.
Open an email containing a Great Coach Hockey database attachment (see Exporting your Database for more information).
Tap on the attachment and your iPad will display a Share Sheet menu
From the Share Sheet menu, select the Copy to Great Coach Hockey option
Great Coach Hockey will then start and a message asking you to confirm importing your database.
If you are sure you want to proceed, select the Import button to import the database.
Your database will then be imported.
Importing from an iCloud Files
To import your database:
Open your Great Coach Hockey application and keep the app open on the Dashboard screen.
Open your Files app and locate your backup file.
Tap on the attachment, then select the Action button in to top left of the navigation bar. Your iPad will display a Share Sheet menu
From the Share Sheet menu, select the Copy to Great Coach Hockey option
Great Coach Hockey will then start and a message asking you to confirm importing your database.
If you are sure you want to proceed, select the Import button to import the database.